 Husbryg
 Integrating Brewfather with Home Assistant
Brewfather currently is one of the best, if not the best brewing software available for home brewers. It offers a fully integrated suite of features ranging from inventory tracking, recipe creation, brewing assistance to fermentation tracking.
However, Brewfather doesn’t currently include features for automating the fermentation process, including options for setting custom alerts e.g. when the temperature gets too high or the specific gravity reaches a certain level. So in the blog post I’ll show you how you can connect Brewfather with Home Assistant in order to build your own automations and alerts.
Preparing Home Assistant
First you’ll need Home Assistant OS installed on a computer or device. This could either be a Raspberry Pi or a dedicated computer that is running 24/7. I’m not going to go through how to install the Home Assistant OS option, but the various options are listed in the official guide. If you are looking for a more thorough step-by-step guide, then I can recommend the YouTube video by Grayson Adams called “FASTEST way to install Home Assistant (2020)“.
Enabling Remote Access to Home Assistant
Second you’ll need to expose your Home Assistant computer to the internet. This might sound a bit scary and it should for obvious reasons. If not done right, you actually risk exposing your entire home network to the internet. The reason for opening access to the internet is that Brewfather need to be able to send data from your fermentation trackers directly to Home Assistant. An added bonus of this is also that you’ll be able to access your Home Assistant remotely, e.g. from the official companion App.
I recommend using the official add-on called DuckDNS to enable remote access. This add-on basically allows you to use access Home Assistant through a fully qualified domain name via https. It also includes automatic renewal of certificates so once setup, you can basically forget all about it. The DuckDNS add-on is installed through the Supervisor -> Add-on Store in Home Assistant. The installation process is fully documented in the DuckDNS add-on, but you can also follow the instructions in the YouTube video by Tech Tech & More Tech called “Remote Access to Your Home Assistant Using DuckDNS“.
Installing Node-RED Add-On
Finally, you need to install Node-RED into your Home Assistant setup. To do this go to the Supervisor -> Add-on Store and locate the Node-RED add-on and install it. Once it’s installed you will need to set a few options in the configuration:
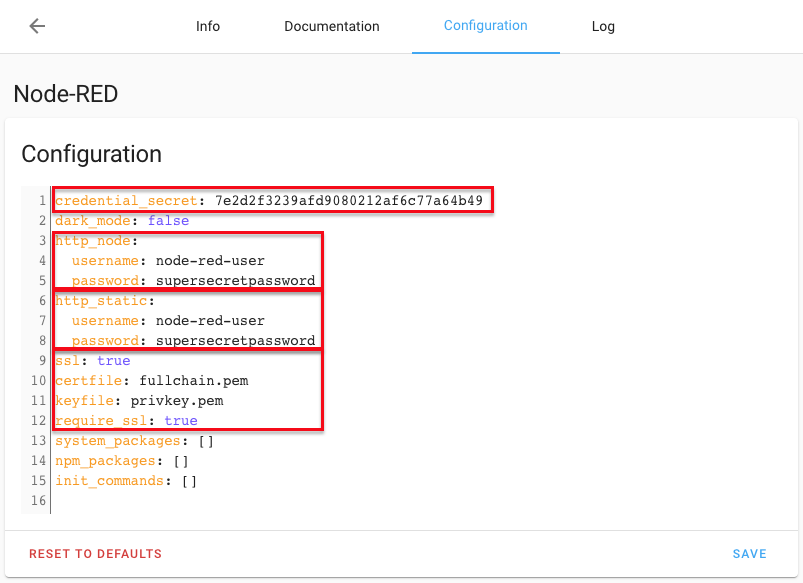
The first setting is the credential_secret. This is used internally by Node-RED to encrypt the credentials used in the flows. It’s a good idea to make a copy of this key and store it elsewhere in case you need to restore the installation.
Next pair of settings are the http_node username and password. These are used for protecting the flow-defined http endpoints with basic authentication. Similar you should set the username and password for the http_static settings.
Finally you need to set the ssl and require_ssl keys to true to enforce use of https only. You also need to set the certfile and keyfile settings to the certificate file and secret key file used by DuckDNS.
Click the “Save” button to save the configuration.
By default it is only possible to access Node-RED via the Home Assistant web UI. In order to allow direct access to Node-RED we need to setup additional port forwarding:
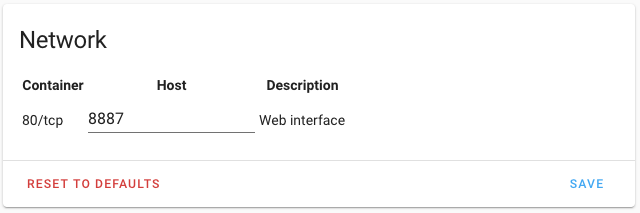
In the Host field select the IP port you would like to use for accessing the http nodes directly, e.g. 8887, and click Save.
This port also need to be added to the port forwarding configuration of your internet router.
Once the Node-RED Add-on has been configured, switch to the Info tab and click the Start button. For easy access to Node-RED you can toggle the switch to have it show in the side bar of Home Assistant.
Testing the Logging Endpoint in Node-RED
Once Node-RED has started it is time for building the flow which will receive the data from Brewfather. Start by opening Node-RED from either the “Open Web UI” or the sidebar button.
First we’ll create a simple flow to test if everything has been setup correctly. We just need two nodes for this, the “http in” and the “http response” nodes.
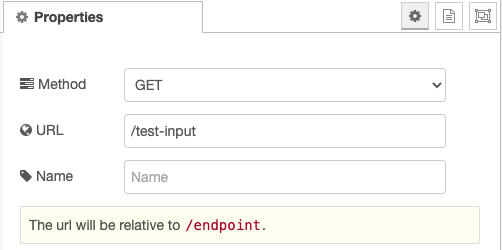
First drag the “http in” node to the canvas and configure it by double-clicking on it:
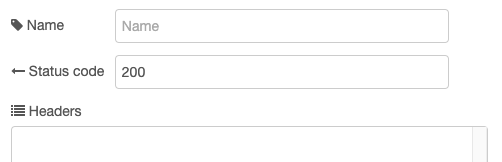
Next drag the “http response” node next to it and configure it to return a status code of 200:
Finally connect the output of the “http in” node to the input of the “http response” node by clicking and dragging the small knob. You should now have a simple flow that looks similar to this. Note that “/endpoint” has been added to the start of the input node by Home Assistant:

Click the “Deploy” button and open a new browser window. In the URL you need to point the browser to the endpoint we just created using the external host name and port, e.g.:
https://myhost.duckdns.org:8887/endpoint/test-input
If everything is setup correctly, the browser should ask your for the username and password we configured earlier. After entering that it should just display a page with “{}” which is the default payload returned by Node-RED. Otherwise if you get any errors, make sure that you have properly configured the network setup for Node-RED.
Configuring the Brewfather Webhook
Start by changing the configuration of the test-input node or create a new “http in” node to receive log messages from Brewfather, e.g.:
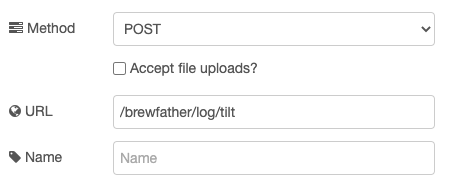
The method must be set to POST. For the URL select whatever is appropriate for your setup. Next connect a debug node to the output of the “http in” node to display the data as it is received from Brewfather. After clicking the “Deploy” button, the flow should now look similar to this:

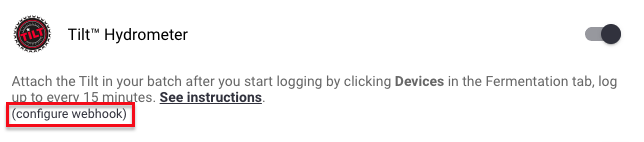
Next you will need to setup a webhook in Brewfather to forward the logged data to Node-RED. Open a new browser window and navigate to the Brewfather Settings page. Click on the “configure webhook” for your particular tracking device, e.g. the Tilt as shown below:
In the dialog, enable the webhook and set the URL to point to your endpoint. Since the endpoint requires basic authentication you will need to supply this in the URL, e.g.:
https://user:passwd@myhost.duckdns.org:8887/endpoint/brewfather/log/tilt
You also need to select whether you want the data to be forwarded as raw or processed data. For the Tilt I recommend to use processed data as this is converted to the format used in Brewfather.
Close the dialog by clicking the “Save” button and switch back to the Node-RED browser and go to the debug panel. After a little while you should start seeing incoming messages from Brewfather:
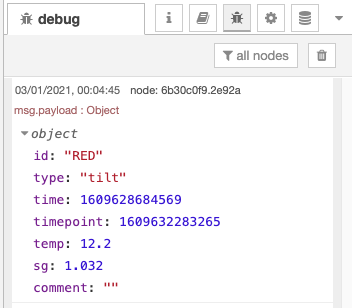
Be aware that Brewfather logs at most every 15 minutes, so it may take some time for the first message to appear.
Forwarding the Data using MQTT
Once the data appears it’s time to add the final step in the flow and make the data available for Home Assistant automations. Since I have already configured a MQTT server I will use this for the final step. If you don’t have MQTT installed yet, you can see this previous blog post for details.
Another option is to use the “entity” node but this requires additional setup and custom integrations in Home Assistant in order to work properly, so I will not cover this option here.
We’ll setup the MQTT topics to each contain a specific sensor attribute. The data payload received from Brewfather therefore need to be split into individual message flows. First drag a “change” node to the canvas and configure it as below:
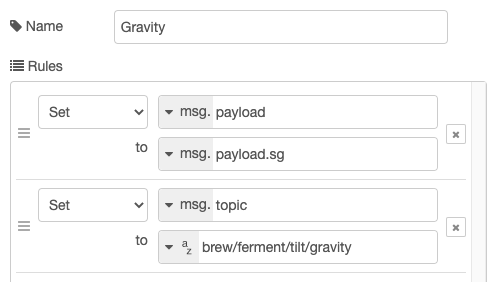
This will take the sg attribute from the Tilt data and set it as the payload for the MQTT message for the gravity topic. A similar node is configured for the temperature parameter.
Next, drag a “mqtt out” node to the canvas and configure it to send the message as below:
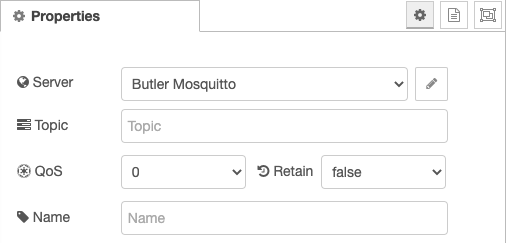
The server will need to point to the MQTT server you have installed. Leave the Topic blank as this will be provided in the message. QoS of 0 means the data will be sent as “fire and forget” and not retained on the server.
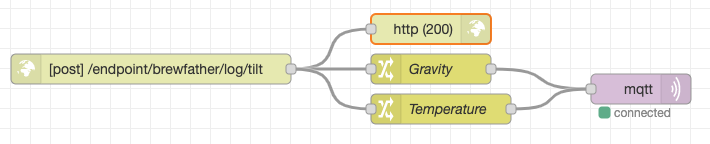
Hooking everything together, the flow should now look similar to this:
Setting up Sensors in Home Assistant
The final step is now to setup the sensors in Home Assistant which will represent the data received via MQTT.
To do this open your configuration.yaml file in Home Assistant and add the following configuration:
sensor:
  # Brewfather Integration
  - platform: mqtt
    name: "Fermentation Gravity"
    state_topic: "brew/ferment/tilt/gravity"
    unit_of_measurement: "SG"
  - platform: mqtt
    name: "Fermentation Temperature"
    state_topic: "brew/ferment/tilt/temperature"
    unit_of_measurement: "°C"
Next go to the “Configuration” -> “Server Control” panel in Home Assistant and click on the “Check Configuration” button. If everything is OK, restart Home Assistant to enable the newly configured sensors.
Once Home Assistant has restarted, you can use the data for basic monitoring or more advanced automation in Home Assistant. For now, the data will just be displayed in simple gauge style, e.g. as shown below:

Hope you found the information in this post useful. Feel free to provide any comments or suggestions below.
2 Replies to “Integrating Brewfather with Home Assistant”
A real lifesaver, I was going mad trying to figure this out during the holidays.
You made my day!
Happy to be of assistance 👍