 Husbryg
 Setting Up a New Raspberry Pi Zero W for GF Connect
There are a couple of ways you can setup a Raspberry Pi for running the GF Connect software which I have covered in previous posts. If you are new to the Raspberry Pi world, this guide should provide you with the needed steps to setup a fresh installation for controlling your Grainfather Connect G30 brew system.
I will use a Raspberry Pi Zero W in this guide, as it is quite cheap. It also has more than enough computing power to run the software and it provides all the needed capabilities such as Bluetooth and Wi-Fi. Below is the minimal recommended list of components you need:
- Raspberry Pi Zero W
- 4 GB Micro SD Card
- Card reader or adapter for your computer
- Power supply
- Pi Zero case
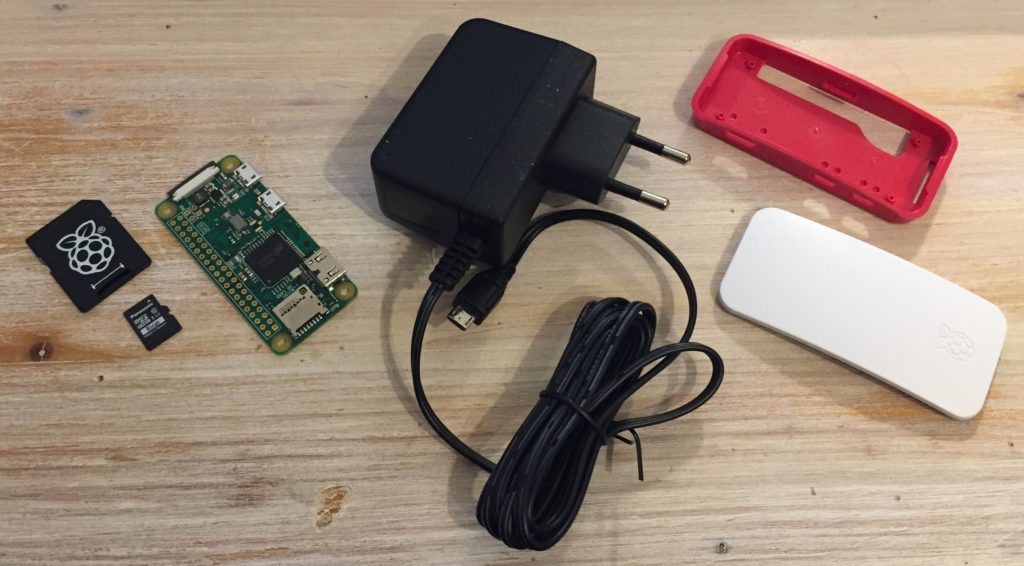
You can often get these components in various bundles together with the Raspberry Pi.
Installing Raspbian OS
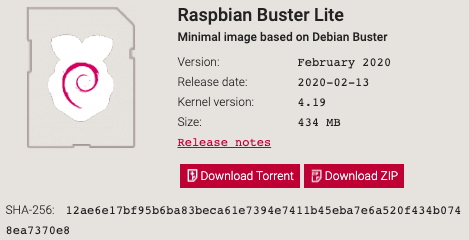
First step is to download the Raspbian image. Since the GF Connect doesn’t require any local desktop software to run on the Pi, the Raspbian Lite image is sufficient.
It can be downloaded from the official Raspberry Pi website. Select the ZIP file and download it to your computer.
Once the zip file has been downloaded it must be unpacked to get the disk image file.
To get the image file written to the SD card, you need to use some kind of formatting tool. I recommend to use Etcher which can be downloaded from balena.io/etcher/
Next, put the SD card into your card reader and plug it into your computer. Open the Etcher tool, click on the Select button and select the Raspian Lite image file you just unpacked.
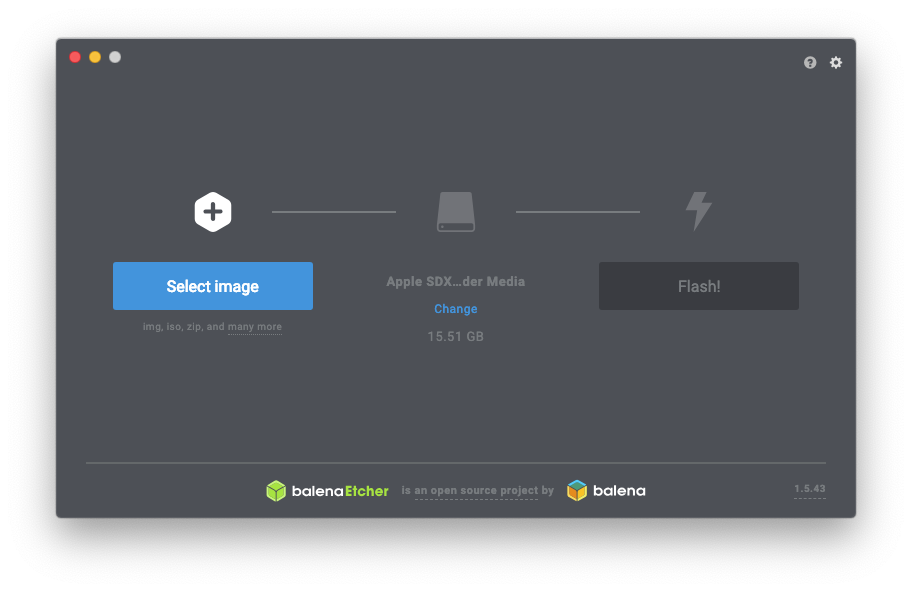
Important: Before clicking on the Flash button, make sure that you have selected the right drive, otherwise you might accidentally format the wrong disk and wiping all its data.
Once you have checked that everything has been selected correctly, click on the “Flash” button. This will format the SD card and install the Raspbian Lite image on it.
When the image has finished being written, the drive will automatically be unmounted. Mount the SD card on your computer and check that a new disk named ‘boot’ appears.
Enable Wi-Fi and Remote Access via ssh
Before the image is ready to use, it needs to be configured to your local Wi-Fi and enable remote access via ssh to the Raspberry Pi.
This can be enabled by putting the following two files into the root of the ‘boot’ volume:
- ssh
- wpa_supplicant.conf
You can create both files with a normal text editor. The ‘ssh’ file is just an empty file, but its presence in the root during boot will enable ssh on the Raspberry Pi.
The ‘wpa_supplicant.conf’ file contains the setup for your Wi-Fi. Paste the following into the file, and replace the ‘ssid’ entry with the name of your Wi-Fi network, and the ‘psk’ entry with the password for the network.
ctrl_interface=DIR=/var/run/wpa_supplicant GROUP=netdev
update_config=1
country=DK
network={
    ssid="your_wifi_network_name"
    psk="your_wifi_network_password"
    key_mgmt=WPA-PSK
}
The Raspberry Pi Zero W only supports 2.4 GHz Wi-Fi so make sure the you don’t enter the name for your 5 GHz network. Also make sure that the file names are spelled exactly as in the list without any additional extensions.
You can now unmount the SD card from your computer and insert it into the Raspberry Pi. Connect the power supply to the USB port closest to the end of the board. You should now see the green LED flashing, indicating that the Pi is booting.

Connecting to the Raspberry Pi
Once the Raspberry Pi has finished booting, you should be able to access it on the network. Start by searching for it with a ping:
$ ping raspberrypi.local
PING raspberrypi.local (192.168.1.98): 56 data bytes
64 bytes from 192.168.1.98: icmp_seq=0 ttl=64 time=8.514 ms
64 bytes from 192.168.1.98: icmp_seq=1 ttl=64 time=6.889 ms
64 bytes from 192.168.1.98: icmp_seq=2 ttl=64 time=9.725 ms
If you don’t get a reply then you can try to open the admin page of your internet router and see if you can find the ip address of the Raspberry Pi. If there is no presence of the Pi, then you need to re-mount the SD card again from your computer and double-check that you have entered the Wi-Fi settings correctly in the ‘wpa_supplicant.conf’ file.
If you do get a reply from the Raspberry, you should now be able to connect to it using ssh as the user pi:
$ ssh pi@raspberrypi.local
The authenticity of host 'raspberrypi.local (fe80:xxxx:7231%en3)' can't be established.
ECDSA key fingerprint is SHA256:qXCc6y6f0LLV+5W1s+sJI0i9to.
Are you sure you want to continue connecting (yes/no)?
Answer ‘yes’ to continue. Next you will be asked for the password for the user. Enter the default password which is ‘raspberry’:
pi@raspberrypi.local's password:
Linux raspberrypi 4.19.97+ #1294 Thu Jan 30 13:10:54 GMT 2020 armv6l
...
SSH is enabled and the default password for the 'pi' user has not been changed.
This is a security risk - please login as the 'pi' user and type 'passwd' to set new password
You have now successfully connected and can start further setup of the Pi. The first thing to do is to change the default password. This can be done by entering ‘passwd’ on the command line. You will be asked for the current password and then asked to provide a new one:
$ passwd
Changing password for pi.
Current password:
New password:
Retype new password:
passwd: password updated successfully
It is also a good idea to change the hostname, especially if you have more than one Raspberry Pi. The hostname is stored in the file by the same name located in the /etc directory. Use the ‘nano’ editor to change this by entering the following on the command line:
$ sudo nano /etc/hostname
Change the name to almost whatever you like, e.g. gfconnect, but only use letters from ‘a’ to ‘z’, digits ‘0’ to 9, and the hyphen ‘-‘. Save the file by pressing ctrl+X, then Y followed by Enter.
You also need to edit the hosts file. Locate the second line starting with 127.0.0.1 and change the name from raspberrypi to the new hostname. Don’t change the entry for localhost:
$ sudo nano /etc/hosts
Finally, restart the Raspberry Pi so the new name can take effect:
$ sudo reboot
Once the Raspberry Pi has rebooted, log in again using ssh:
$ ssh pi@gfconnect
Installing Node-RED
The Raspberry Pi is now ready for installation of the Node-RED software which will provide the environment for running the GF Connect tool. A more detailed description of the installation is available on nodered.org. Start the installation by entering the following on the command line:
$ bash <(curl -sL https://raw.githubusercontent.com/node-red/linux-installers/master/deb/update-nodejs-and-nodered)
Answer yes to the two questions about installing the software. Then sit back and follow the progress of the installer. It should take about 15 minutes to install on a Zero W.
Next type the following command to start Node-RED as a background service:
$ node-red-start
Start Node-RED
Once Node-RED has started, point a browser at http://192.168.1.98:1880
On Pi Node-RED works better with the Firefox or Chrome browser
...
Make a note of the specific address written by the start script as it will be needed later. Press ctrl+C to get back to the command line. This will not stop Node-RED because it was started as a service.
By default Node-RED stores context data in memory only. This can be changed to file based so the settings of GF Connect doesn’t have to be entered every time the Raspberry Pi is rebooted.
Additionally, the project feature of Node-RED should also be enabled as it simplifies the installation and update of GF Connect. To edit the settings, enter the following on the command line:
$ nano ~/.node-red/settings.js
Type ctrl+W and search for “contextStorage”. Then delete the leading ‘//’ from the following lines to enable file based storage:
contextStorage: {
 default: {
   module:"localfilesystem"
 },
},
Next type ctrl+W and search for “projects”. Then change the value for enabled to true:
editorTheme: {
  projects: {
    // To enable the Projects feature, set this value to true
    enabled: true
  }
}
Save the file by typing ctrl+X, then Y followed by Enter. The project feature requires ‘git’ to be installed, so this need to be installed by entering the following on the command line
$ sudo apt update
$ sudo apt install git
Restart Node-RED to use the new settings by typing the following commands:
$ node-red-restart
$ node-red-log
The second command displays the log from Node-RED. Inspect the log and check if there are any warnings displayed. The two warnings about no active project and use of default flow credentials can be ignored for now.
If you want to enable Node-RED to automatically start when the Raspberry Pi is turned on or re-booted, enter the following command on the command line:
$ sudo systemctl enable nodered.service
Node-RED is now started and ready to use. Point a browser to the address written by the start script above, e.g. http://192.168.1.98:1880. You should also be able to use the hostname instead of the ip address, e.g. http://gfconnect:1880
This should open a window similar to this. If you are prompted with a dialog for creating a new project, just click the button “Not right now” to dismiss it.
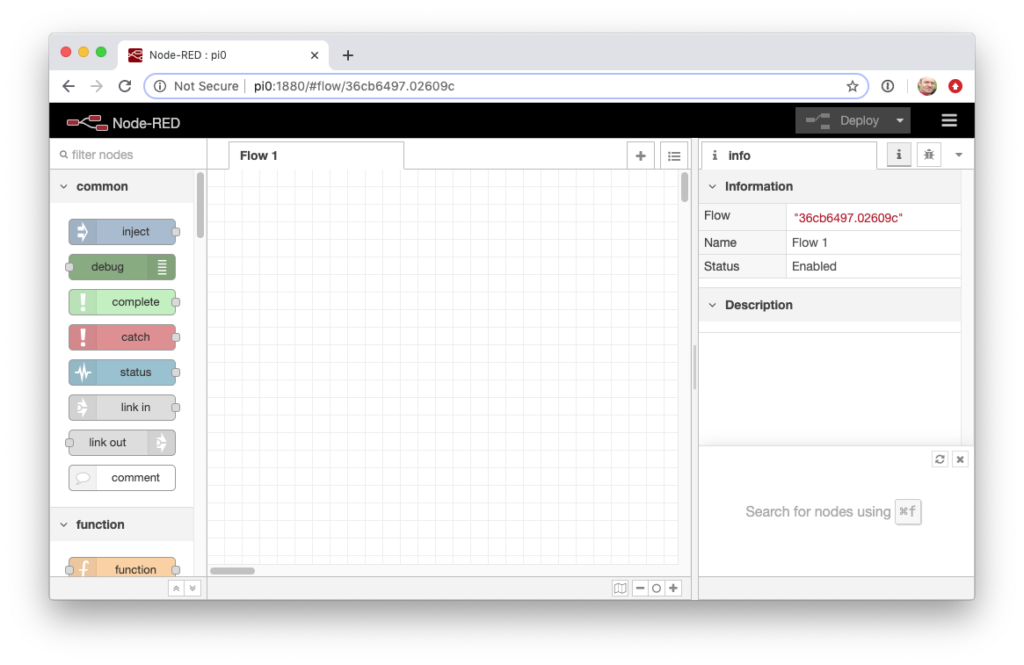
For more information about Node-RED and how to get started writing your own flows, you can read the tutorials and other documentation at nodered.org
Installing Required Components in Node-RED
The GF Connect flow depends on a few extra components to be installed in Node-RED. They can be installed via the Palette Manager which is accessed via the menu in the top right corner of the Node-RED editor.
Click on the Install tab and enter “node-red-dashboard” in the search field:
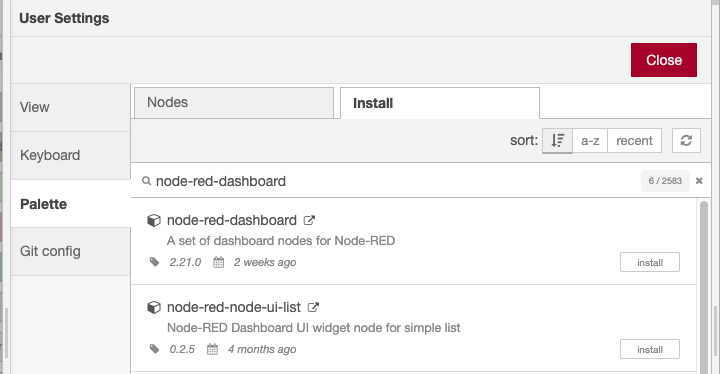
Click on the install button for the “node-red-dashboard” component and confirm the Install in the popup that appears.
Once the installation is done, continue with installation of the following components:
- node-red-node-rbe (may be pre-installed)
- node-red-contrib-ui-level
- node-red-contrib-noble-bluetooth
Installing GF Connect
All the required components have now been installed and the GF Connect flow can be installed. From the top-right menu, select the “Projects” -> “New” entry.
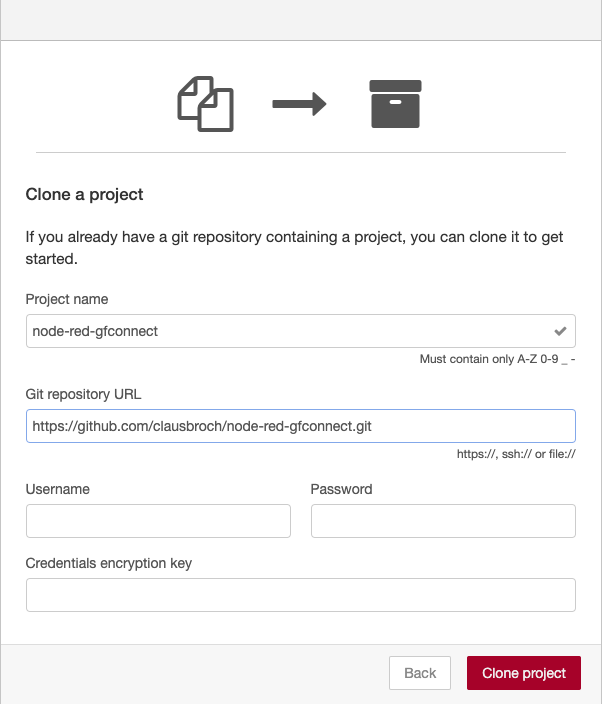
In the dialog select the “Clone Repository” option. Next enter your username and associated email for your Github account. If you don’t have a GitHub account, just enter your name and email. It is not needed for read/only access to Github.
Next enter the following in the field for “Git repository URL”:
https://github.com/clausbroch/node-red-gfconnect.git
This will automatically fill out the project name. You can just leave the other fields empty for now. Click on the “Clone project” button to install the GF Connect software directly from Github:
The Node RED editor should now have been populated with the GF Connect flow and look similar to this:
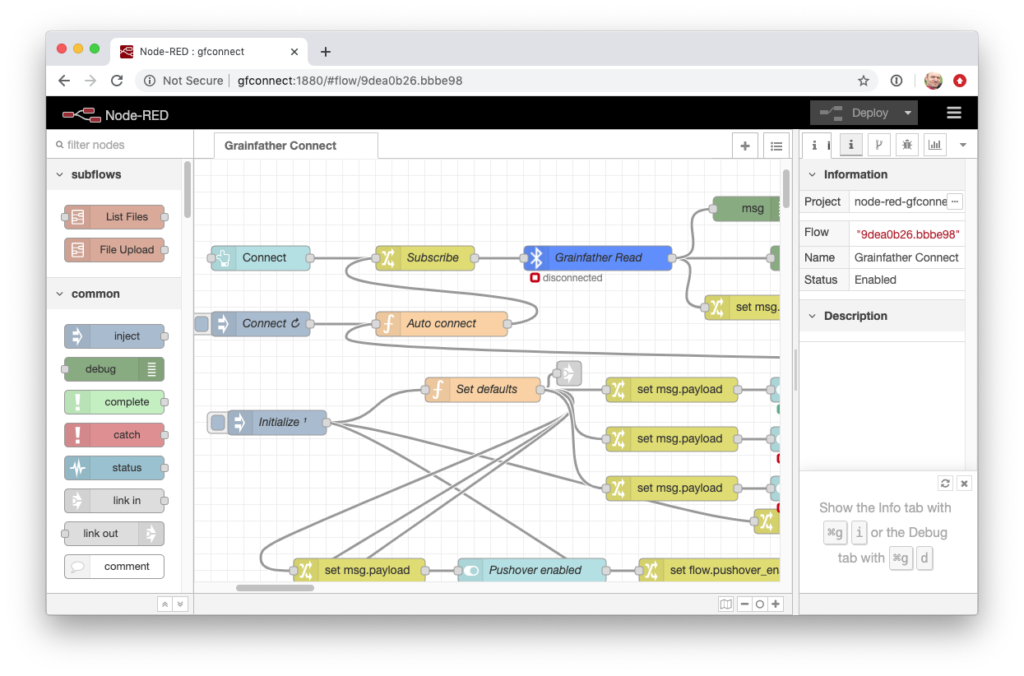
The GFConnect dashboard can now be accessed from http://gfconnect:1880/ui/ where gfconnect should be substituted with the selected hostname or the ip address of your Raspberry Pi.
Brew Sessions
In order to start a brew session you first need to establish a connection between the Grainfather controller and GF Connect. Then you navigate to the Brewfather File upload panel and upload the batch json file you have downloaded from the Brewfather brew planner website.
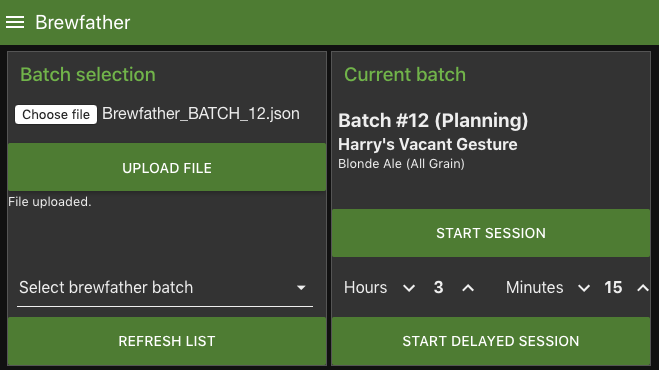
Click the “Upload File” button to load the recipe into the Raspberry Pi.
It is also possible to fetch the recipe directly from Brewfather. First click the “Refresh List” button to fetch a list of batches that are ready for brewing (“Planned” or “Brewing” status). Next select the batch from the drop down list to load it into the Raspberry Pi.
Note: Loading recipes directly from Brewfather is currently in preliminary testing phase. In order to use this feature you need to request a User Key and API Key directly from Brewfather and entered these in the GF Connect settings. See docs.brewfather.app/api for details.
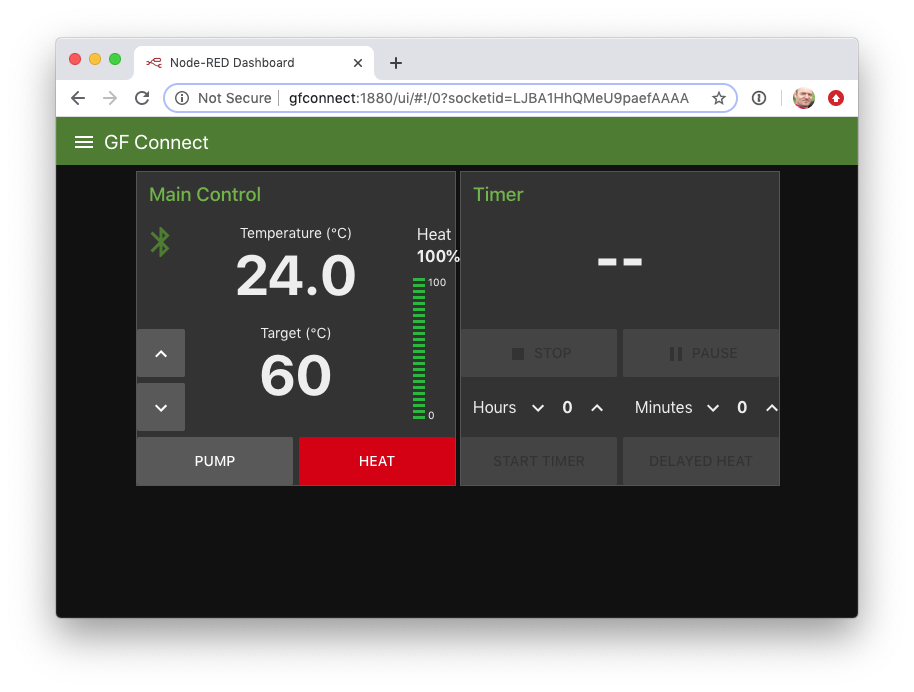
Once the recipe is loaded, you can start the brew session by clicking “Start Session”. Alternatively you can delay the session start by setting the number of hours and minutes and clicking the “Start Delayed Session”. The recipe will now be sent to the Grainfather controller and you can start brewing:
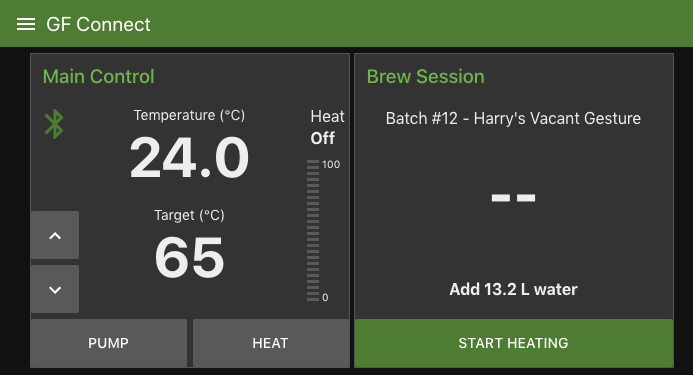
You will now be able to control the brew session from the GFConnect panel or from the Grainfather controller.
Happy brewing !
Updated May 28, 2020: This post has been updated to reflect the release of GF Connect v0.9.2. The section describing how to setup the bluetooth pairing with Grainfather has been removed as this is now handed automatically.
4 Replies to “Setting Up a New Raspberry Pi Zero W for GF Connect”
Hi, i think i might have found an error in the Installing Node-Red components section.
You mention to install node-red-node-rbe, this one is already included in the Node-Red installation package.
But its missing node-red-dashboard which is a needed component to get the flow working. Without it you get a long list of errors due to missing components later when you clone the project.
hi, i am sorry, my dyslexia hit me again…. 🙁
It is there i see that now.
SORRY!!
No problems 🙂
I have added a note for the rbe component that it might already be installed.
great job
loving it, apart from I don’t know my api on brewfather, so can’t get to recipes at moment
but testing it with a boil everything connects a reads temps
#